Loop Hero Card and Deck Building Guide
Master Loop Hero's card mechanics with expert tips on card types, optimal deck combos, boss-focused strategies, and adapting your build effectively.
Figuring out the best cards to bring into each expedition in Loop Hero can feel like its own puzzle, separate from the action on the loop itself. The way you build your deck heavily influences what you'll encounter, how strong your hero becomes, and even how manageable your runs will be. With each loop, the decisions you make when selecting cards determine your resources, enemy encounters, and environmental effects around you. It's not always obvious which cards pair well together or how many to include, especially since too much or too little can end up working against you. Taking time to understand how card mechanics interact--and knowing which combinations best suit your playstyle--can greatly improve your hero's chances on the road ahead.
The Basics: Types of Cards in Loop Hero
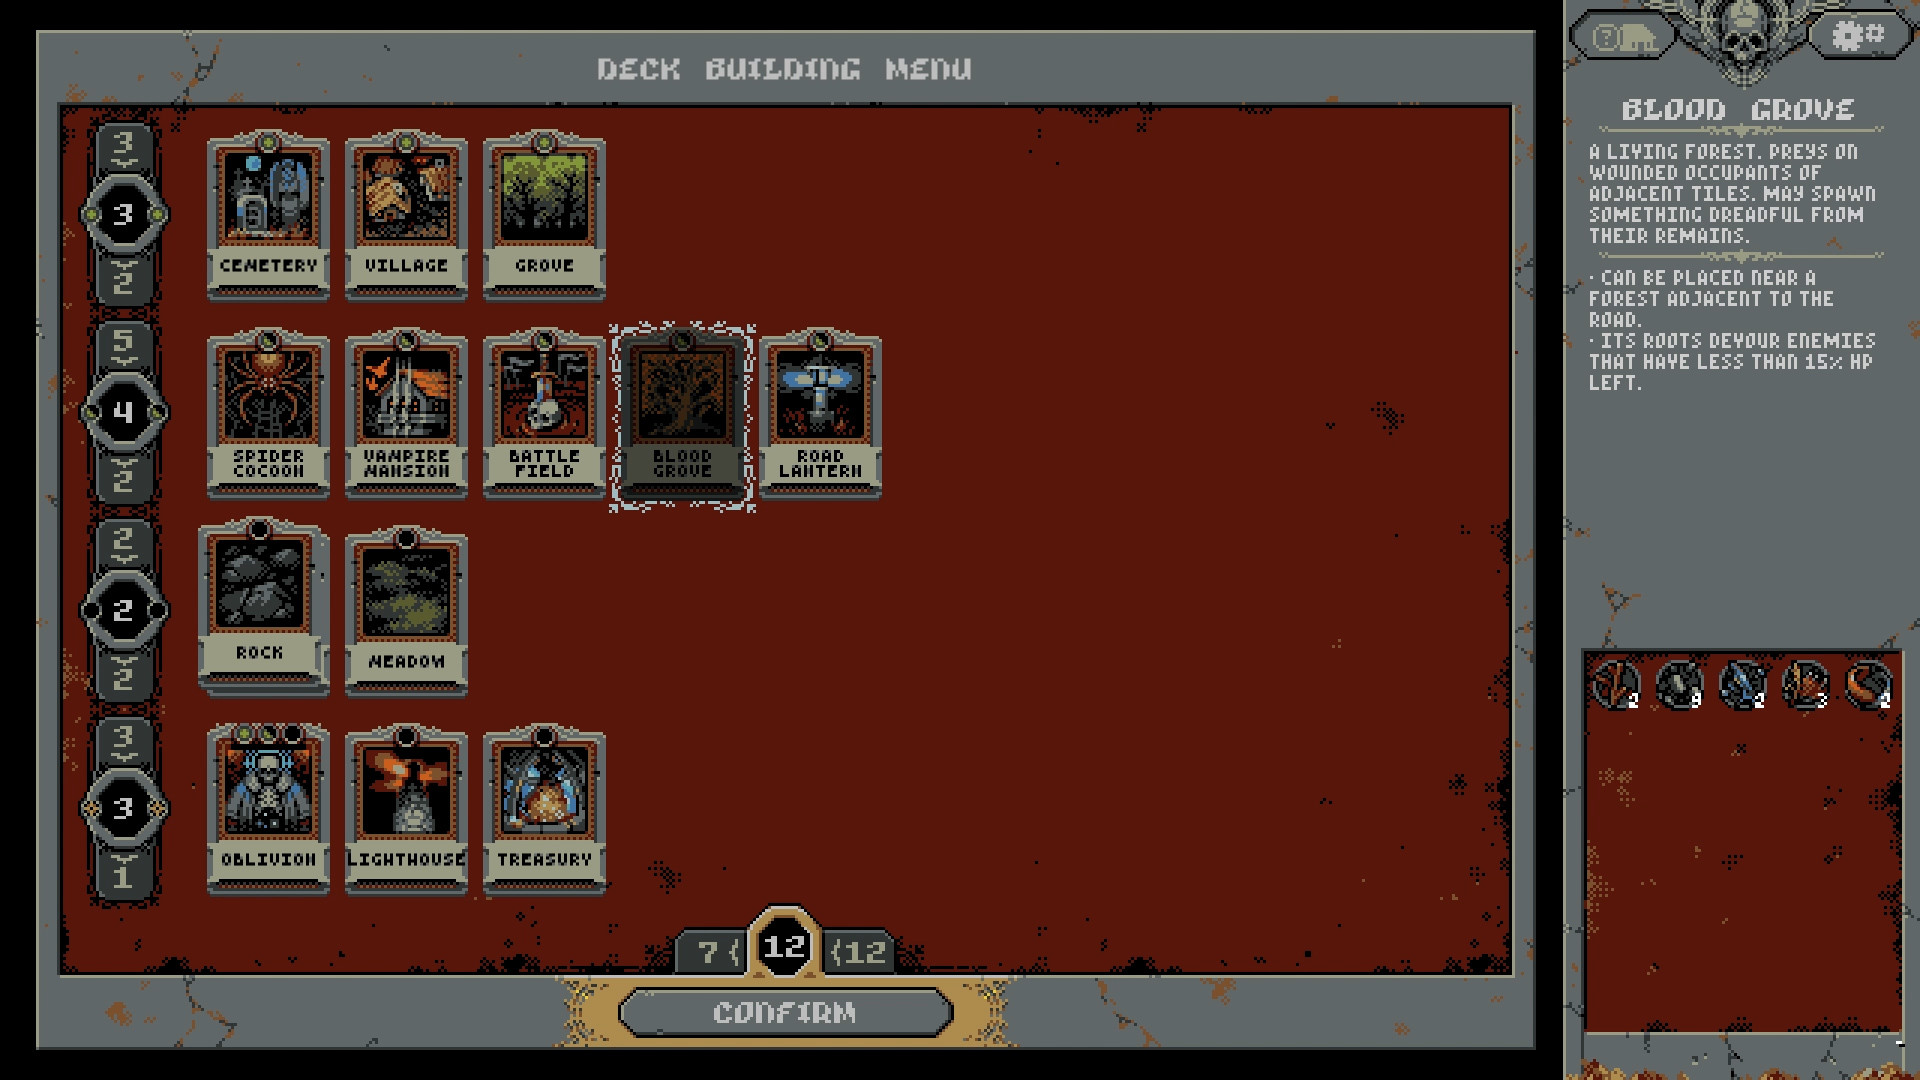
In Loop Hero, you'll craft your expedition deck from multiple card categories that each impact your experience differently. Think of your cards as puzzle pieces-- once you know how they fit together, you'll start setting yourself up for longer, more rewarding adventures around the loop. Here's a straightforward explanation of the four main card types and their roles:
Terrain Cards
Terrain Cards directly alter the loop or the surrounding environment. When placed down, they usually offer stat boosts, healing, or resources critical for survival. Cards like Mountains and Meadows award bonuses as they stack or sit next to other cards. By placing terrain thoughtfully, you turn the landscape around you into an ally against tougher enemies.
- Mountains and Rocks: Boost your total health--a must-have to withstand increasingly tough monsters as loops progress. Putting them together in a 3x3 pattern turns them into a Mountain Peak, bumping your health even more but also spawning new enemies like Harpies.
- Meadows: Place them next to a non-meadow tile, and you've got yourself a Blooming Meadow, granting extra daily HP regeneration.
Carefully managing these terrain cards makes survival that much easier, especially on later loops.
Road Cards
Road Cards change what enemies you face during each expedition by placing new obstacles directly along your hero's walking path. Every enemy encounter means fighting, loot drops, and more resources, but too much pressure may overwhelm your hero.
- Spider Cocoon: Throws spiders into the mix regularly, excellent for early runs if you're looking to gain experience and loot quickly.
- Vampire Mansion: Introduces bloodthirsty Vampires with fights, tough enemies indeed, but they bring valuable loot and stronger boosts if defeated.
Be cautious--too many Road Cards placed at once can overwhelm the hero with enemies. Striking a smart balance is key.
Roadside Cards
Unlike Road Cards, Roadside Cards must be placed adjacent to your path, not directly on it. These tricky tiles benefit your hero indirectly by adding useful effects during enemy encounters:
- Battlefield: Situated alongside your path, it creates treasure chests at the loop's start, generous for getting rare equipment upgrades. Beware, though, placing multiple battlefields where their effects overlap transforms overlapping tiles into Blood Paths spawning harmful Blood Clots rather than chests.
- Blood Grove: Placing it near a Grove tile means it clears out weakened enemies, quickly wrapping up tough battles. Handy, yet watch out--letting numerous Blood Groves linger can lead to extra-hard opponents spawning later.
Treat Roadside Cards as supportive companions--they significantly ease or toughen your run based on placement strategies.
Special Cards
These unique cards don't fit neatly into your standard categories and instead offer game-changing special benefits. Use them thoughtfully to control challenging loops or harvest extra resources:
- Oblivion: Your personal "Oops" button--deletes any tile that isn't working for you. It's super helpful if you've gotten yourself in too deep against dangerous enemies or placed something accidentally.
- Treasury: Drop this card in an empty spot to start stacking resources around it. When all eight surrounding tiles fill, the Treasury shatters, giving a resource windfall but also spawning Gargoyles. It's a controlled risk-and-reward card that smart players take advantage of regularly.
Understanding Special Card timing makes a big impact, letting you recover from mistakes or take calculated risks.
Card Selection Strategy in Action
Loop Hero rewards experimentation. Are you focused on safely accumulating resources or aiming for quicker but riskier loops? It pays to think about your objectives before entering an expedition, giving you a better idea of what cards should make that carefully-crafted deck.
Simple, efficient decks can yield reliable runs if you're after resources and safer loop progression. For example, pairing Spider Cocoons or Groves with Blood Groves ensures you clear enemies more easily. Or you could instead experiment--throw Vampires into your loops, add a Battlefield nearby, and accept more dangerous encounters for better loot drops.
Deck Size Matters
Unlike typical deck-building games, purely packing your deck with every possible card isn't beneficial in Loop Hero. A lean deck means you'll see more of your most valuable cards more often, keeping things predictable and manageable. Overloading a deck dilutes the frequency of desired cards and can make loops tougher by limiting your control over what's happening.
Aim for around 10-12 cards as a comfortable sweet spot--allowing enough variety to navigate loops without losing the consistency needed for longer runs.
Wrapping Up Card Types
Getting comfortable with these card types and their interactions moves your gameplay beyond merely surviving to skillfully planning expeditions. After some experimentation, you'll recognize how placement and combinations significantly change your hero's odds, making you feel less like you're gambling and more in control.
Remember, Loop Hero rewards those who learn and adapt. Soon you'll intuitively grasp when to go risky with Vampires and Battlefields, or when a solid Mountain-Meadow roadmap sustains you best. Feed your knowledge loop by exploring these card mechanics and soon you'll comfortably control your expeditions, gathering valuable resources and defeating even the harshest enemy encounters Loop Hero throws at you.
Optimal Deck Combinations
Loop Hero is all about creating smart card combinations to get the most out of each loop. Throwing random cards into a deck will only take you so far; thoughtful combinations keep your hero alive, earning more loot and resources. Let's look at proven decks that players swear by to help you handle even the toughest loops--whether you're grinding resources or aiming to defeat a challenging boss.
Resource Harvesting: Safe, Steady, and Reliable
When you want slow, steady progress without constant danger, focus on decks designed to maximize resources and minimize threats. One solid option is mixing these cards:
-
Spider Cocoon + Battlefield + Blood Grove + Road Lantern:
Place your battlefields near campfire tiles at loop beginnings, providing loot chests consistently. Position Spider Cocoons sparingly around pathways, generating easy, predictable enemies for steady loot and experience. Now, keep Blood Groves near fighting areas to remove weakened enemies quickly. Road Lanterns nearby reduce the maximum enemy spawns, easing the pressure on your hero. -
Rocks, Mountains, and Blooming Meadows:
Health matters a lot, especially over multiple loops. Create Mountain Peaks by bunching Rocks and Mountains closely. Place Meadows next to non-Meadow tiles (like Mountains or Treasuries) to make Blooming Meadows, boosting your daily HP regeneration, keeping your hero topped up loop after loop.
This strategy provides consistent results for calm runs where you slowly gather materials, experience points, and stable gear upgrades.
Aggressive Loot Runs: High Risk, High Reward
Want big loot quickly? You're gonna need to invite tougher foes onto your path. Try these card combos to increase threats slightly for incredible drops:
-
Vampire Mansion + Village + Wheat Fields Rapid Loop:
Villages provide quests giving bonus loot, and when placed beside Vampire Mansions, become Ransacked Villages initially. Survive three loops, though, and these corrupted villages evolve into Count's Lands, a village with strong healing effects and high-quality quests. Wheat Fields placed next to these villages spawn weak but plentiful Scarecrows--ideal loot and experience farms without massive risk. -
Groves + Blood Groves + Spider Cocoons:
Groves produce Ratwolves, which Blood Groves will mop up when they're almost defeated. Mix these alongside Spider Cocoons, and you'll continuously spawn manageable waves of moderate-difficulty enemies. You're guaranteed regular XP and loot drops without overwhelming your loop.
This setup isn't the safest. It's built for quicker runs focused on grabbing essentials early, risking fights against groups of enemies. Adjust it based on your comfort level and confidence in loop management.
Optimal Boss-Clearing: Balanced and Prepared
Ready to tackle Loop Hero's challenging chapter bosses? You're going to need decks that strike a careful balance between advancing safely and hunting powerful equipment. Consider these decks when boss fights are imminent:
-
Oblivion, Temporal Beacon, Treasury for Control
Oblivion is essential, letting you delete troublesome tiles right before a boss fight or unwanted Goblin Camps and Bandit Camps. Temporal Beacons speed up daily cycles, giving quicker regeneration and helping you better time enemy encounters. Filling Treasuries grants tons of handy resources and high-tier gear as you finish surrounding the cards, giving you a strong edge heading into boss encounters. -
Road Lanterns + Battlefields + Blood Groves:
Road Lanterns cut back enemy stacking, Battlefields grant consistent loot-chests each loop, and Blood Groves aggressively clean weakened enemies off your path. Careful placement is key--cluster your Battlefields away from paths so you avoid dangerous Blood Clots. Keeping controlled group sizes and steady loot drops lets you master your progression toward challenging loop bosses smoothly.
Combine this selection of defensive and reactive cards with terrain cards (Mountains, Rocks, Meadows) for health boosts and regeneration. Your hero walks the loop stronger, better equipped for lengthy battles awaiting at run's end.
Deck Options by Class
Loop Hero's three classes--Warrior, Rogue, and Necromancer--each have different strengths that benefit from unique deck composition:
-
Warrior (Stamina Build):
Mountains, Rocks, Blood Grove, Road Lantern, Meadows. Warriors benefit greatly from maximum health and regeneration. Keep threats manageable, and loot quality balanced. -
Rogue (Fast Farm Build):
Spider Cocoon, Vampire Mansion, Battlefield, Grove. Rogues get improved gear by farming more creatures quickly. Their faster attack rate means battles go swiftly, and plentiful enemies provide tons of loot tokens. -
Necromancer (Summon Control):
Cemeteries, Battlefields, Temporal Beacon, Road Lantern. Necromancers have handy minions, making Cemetery skeletons easy to deal with. Road Lanterns limit pile-ups that would overwhelm summons, while Temporal Beacons quicken daily loops for faster summon regeneration.
Matching your deck combination to your chosen class's strengths makes the toughest loops manageable, giving you tactical flexibility in later chapters and tricky boss encounters.
Decks to Avoid: Beware Overwhelming Situations
Certain card combinations cause significant harm if handled poorly. Mismanaging some tile placements frequently results in frustrating loops. Avoid common pitfalls:
-
Multiple Overlapping Battlefields:
Too many Battlefields placed closely convert paths into dangerous Blood Paths, cluttering your loop with challenging Blood Clot monsters--not fun or efficient. -
Excess Goblin and Bandit Spawns:
Goblin Camps and Bandit Camps appear if tiles get placed recklessly. One or two camps are manageable, but too many will drain your resources and stamina with constant annoying battles. Keep an Oblivion handy to remove unwanted enemy camps.
Remember, successful loops aren't just about WHAT cards you use; it's HOW you use them.
Closing Tips: Adapt Your Deck Wisely
There's no universally perfect Loop Hero deck. Winning combinations evolve with your goals, loop number, and comfort level in managing risks. Try different matches, tweak placement strategies, or mix in different cards to adjust difficulty and rewards as you go.
Smart loops spend some early time experimenting. When you've found a style suiting your play, stick close to it, but don't fear adjustments as the game becomes tougher. Strategic combinations matter most when reacting to evolving challenges, changing priorities mid-run, or seizing advantageous opportunities along the loop.
Keep playing, keep adjusting, and soon placing the right cards feels second nature. You'll achieve more successful runs, better treasure hauls, cleaner boss fights--and, best of all, Loop Hero will feel rewarding every single loop around.
Managing Card Diversity: Building a Balanced Deck for Success
Loop Hero rewards smart deck choices just as much as it punishes reckless tile placement. Poorly managed card pools will clog your hand with unplayable tiles or unwanted situations. Keeping your decks lean, balanced, and varied lets you adapt easily to surprises, maintain control of the board state, and keep your hero ready for whatever comes next.
Avoid Over-Stuffing Your Deck
It might seem tempting to cram in every available card, hoping to have a solution for every situation. But a bloated deck actually does the opposite--you'll end up frustrated, stuck drawing tiles you can't effectively use. Loop Hero is a game about careful placement and timing, not about constantly playing cards. Limit your deck size to a focused collection, with clearly defined roles for each tile.
Most runs benefit from around 10-12 cards. Any more than that usually clutters your inventory with less-than-useful options. For example:
- Set distinct purposes for your landscape cards. Mountains and Rocks raise your maximum HP, while Meadows enhance daily regeneration. Use enough of each to sustain yourself without overloading the landscape.
- Limit monster-spawning cards to 2 or 3 types per deck. Groves and Spider Cocoons together already populate loops heavily; adding Ruins or Swamps without caution can quickly balloon monster encounters into exhausting fights.
Smaller, targeted decks keep your hand filled with useful cards you'll regularly play, letting you carefully pace loop difficulty on your own terms.
Balance Your Sources of Loot and Risk
Great loops come from finding harmony between enemy generation and loot rewards. Too safe means little experience and poor loot quality. Too aggressive turns your loop into a nightmare of overwhelming threats. Make sure every card in your deck serves a clear reward-risk purpose.
Consider pairing enemies with environmental helper tiles:
- Ratwolves (Groves) and Spider Cocoons provide steady loot from manageable enemy numbers. Pair them with Battlefields or Count's Lands (Vampire Mansion + Village), giving consistent high-quality loot and safe recovery stops.
- Ease tougher monster groups like Skeletons (Cemeteries) or Vampires (Vampire Mansions) by placing supportive cards like Blood Groves nearby. They finish enemies quickly, reducing your overall risk and speeding progression.
Always plan ahead: if you insert challenging enemies into your loop, include companion cards geared toward recovery (villages, Wheat Fields, Meadows) or crowd-control (Road Lanterns).
Reactive Cards Are Essential
Some cards don't spawn enemies or directly create landscapes--they shape the loop reactively. These reactive cards--Oblivion, Road Lanterns, Temporal Beacon--are vital safety valves. Without them, a loop can easily spiral out of control.
- Oblivion removes problematic tiles entirely from the map, letting you clean up accidental Goblin Camps, Bandit Camps, or overly crowded monster spawns. Always keep Oblivion in your decks--it safeguards you at crucial moments.
- Road Lanterns thin enemy populations, limiting dangerous enemy stacks. Instead of facing overwhelming, health-draining groups, Lanterns scale enemy encounters into winnable fights.
- Temporal Beacon transforms loops differently by speeding the passage of days. With quicker days come faster regeneration effects and special interactions, though this card requires thoughtful placement. It can speed useful events but also hasten dangerous ones, like enemy respawns. Test your placements carefully.
A well-built deck has defensive tools at hand. Reactive cards grant flexibility, letting you avoid frustrating combinations, and tame the riskier strategies you might want to try.
Strive for Variety and Flexibility, Not Rigid Repetition
While veteran Loop Hero players develop preferred deck configurations, restricting yourself to overly predictable setups leads to boring, repetitive gameplay. For sustained enjoyment--and better control of tougher chapter loops--vary your deck when trying new chapters, hero classes, or builds.
- If you've gotten comfortable always using Groves and Blood Groves, challenge yourself by swapping in Cemeteries and Ruins on later runs. You’ll grow more skilled at adapting placements quickly.
- Experiment with entirely new support combos: perhaps you've never seriously tried Bookery tiles, or roadside Chrono Crystals to boost Meadows' healing. Each of these expands your tactical understanding and opens new methods of controlling loop flow.
Mix it up regularly, especially when trying harder loops--variety lets you learn quickly, adapt to rough spots during boss loops, and keeps each run interesting.
Card Diversity Especially Matters By Chapter Three & Four
As chapters progress, loops become tougher. Enemy combinations grow more difficult, boss mechanics increasingly complex. Now more than ever, carefully managing card diversity makes or breaks your runs.
Smarter enemy placement and careful stretching of your deck's flexibility directly determine late-game survivability. Chapter Three onward requires carefully distributing enemy threats evenly around the loop--too many difficult monsters spawning near loop entry points drains you before you even face bosses. Using carefully placed Road Lanterns and Oblivions mitigates dangers and balances gameplay pace, keeping runs manageable and satisfying in the face of heightened risk.
At its heart, Loop Hero’s strategy revolves around thoughtful, intentional choices. Managing diversity in your deck choices reflects that philosophy clearly. Specifying each card's role, planning synergies deliberately, and thoughtfully including reactive tiles create deck harmony: adaptable while staying powerful enough to push through tough spots. Embrace variation, manage your risk-to-reward ratios carefully, and you're setting yourself up for confident loops and far more consistent victories.
Deck Building for Bosses
Facing bosses in Loop Hero changes the pace of the game significantly. While regular loop strategies let you coast comfortably, bosses require specialized decks built with clear purpose. You shouldn't aim to simply survive the loops leading up--you must arrive at boss fights strong, ready, and capable of countering unique boss abilities.
Here are strategies to approach deck building specifically to handle Loop Hero's toughest challenges: its bosses.
Identify What Each Boss Demands from Your Deck
Every chapter boss in Loop Hero brings its own mechanics that force you to adjust your standard deck strategy. A deck effective against the Lich (Chapter 1 boss) might fumble against the Priestess (Chapter 2 boss) or the resource-draining Hunter (Chapter 3). Before choosing cards, decide clearly which chapter boss you're targeting and understand their distinctive features.
Combating the Lich (Chapter 1)
The Lich, Loop Hero's first boss, places Palace tiles around your campfire, benefiting from each Palace still standing during the encounter. Your deck must have a reliable way to destroy Palace tiles or occupy their spawn locations:
- Oblivion is your best tool here. Save one or two Oblivion cards specifically for clearing out the Lich's Palaces just before battle begins.
- Alternatively, placing your own tiles like Villages, Spider Cocoons, or Groves around your campfire early in the run denies the boss open spots to summon Palace tiles.
Because the Lich's damage ramps up with these tiles present, any deck you craft for this battle should always include Oblivion and carefully chosen landscape tiles to minimize Palace placements.
Wrangling the Priestess (Chapter 2)
The Priestess fight introduces summoned mirrors assisting her attacks. Your deck should consider managing multiple foes carefully:
- Blood Groves shine here. They automatically finish off weakened mirrors quickly, taking them off the board and decreasing incoming damage significantly.
- Villages and Wheat Fields, placed near the loop's start tile, offer consistent healing before facing the Priestess and her mirrors. A few moments of recovery before the boss tile increases your survival odds.
- Additionally, Road Lanterns around your camp can limit mirror spawns, ensuring fewer dangerous minions to drain your HP before targeting her directly.
In this fight, a well-rounded deck includes supportive structures and enemy-control measures to efficiently keep mirror numbers under control.
Thwarting the Hunter (Chapter 3)
Facing the Hunter upends your typical strategies, as he deploys attack hounds. These minions weaken your hero, draining and debuffing consistently:
- The hero needs regular health regeneration more than ever. Chrono Crystals paired with blooming Meadows boosts daily health regeneration reliably, keeping your HP topped up.
- Meanwhile, Battlefields giving out steady, high-quality loot before reaching the Hunter is extremely useful. Equip powerful gear pieces to offset debuffs and boost character stats heading into the fight.
- Once again, Blood Groves help immensely in quickly removing hounds that fall to lower health, significantly reducing your prolonged risk.
Preparation for the Hunter mostly means sustaining reliable regeneration sources, carefully selecting your gear sources, and effectively removing his dangerous minions as quickly as possible.
Battling Omega (Chapter 4)
Chapter 4 pits you against Omega, Loop Hero's final and most challenging boss. Omega pushes all your strategic knowledge, testing the very limits of your loop management abilities:
- Omega attacks with multiple powerful forms. Bring Ancestral Crypt golden card for playing as Necromancer, or Arsenal if you're playing Warrior or Rogue. These special structures grant extra equipment slots or beneficial buffs, drastically increasing your combat capacity against Omega's shifting attack methods.
- Enemy spawns grow fierce and rarely forgiving leading up to Omega. Maintain Oblivion tiles ready for unexpected spawns right before your loop end. Thin opponent ranks aggressively.
- The boss fight challenges your sustained healing. Include deck staples like Vampire Mansions + Villages for steady health recovery or summon multiple Battlefields to offer powerful loot upgrades preparing you for the showdown.
Omega demands thorough loop preparation and deck synergy mastery. You're likely to face failure initially; refine decks with carefully-picked combos you've personally tested.
Cards Every Boss Deck Should Consider
Alongside specific counter-strategies unique to chapters, boss-centric builds consistently benefit from including a handful of universal favorites. Regardless of whom you're preparing to face, these are choices worth considering every time:
- Oblivion: Always necessary. Never fight bosses without it. Cleaning dangerous tile setups before battle helps immensely.
- Road Lanterns: Keep enemy groups manageable before boss fights. By carefully spacing these along challenging stretches, you reduce the risk of losing precious health right before the showdown.
- Blood Groves: One of the most reliably useful cards in Loop Hero, trimming enemies consistently helps clear troublesome minions during boss encounters.
- Good, consistent loot-generation tiles (Battlefields, upgraded Villages combinations): There's no easier route to boosting gear quality consistently before battling a boss.
Deck Size: Smaller is Better When Boss-Focused
In regular loops, decks can get fairly large. Boss-focused strategies benefit greatly from smaller decks (around 10-12 cards max), limiting randomness. Choose only cards that directly help your survivability, loot generation, or enemy management. The fewer cards you carry, the quicker your hand refreshes, guaranteeing that important tiles appear early and your strategic plans progress smoothly.
A leaner deck also simplifies road management. Playing fewer monster placements overall reduces complexity, allowing clear, precise arrangements of healing and support tiles exactly where you want them.
Creating decks specifically tailored for Loop Hero's bosses requires some trial-and-error testing, understanding boss mechanics thoroughly, and consistently adjusting your strategy. Establish clear goals--destroy Lich's Palaces swiftly, control the Priestess' mirror minions, sustain against Hunter's minion pressure, or survive Omega's brutal multi-form attacks--and craft clearly effective strategies accordingly.
With patience, flexibility, and carefully considered deck-building tactics, you'll confidently handle challenging bosses--and conquer your loops like a pro.
Adapting Your Deck as the Game Progresses
In Loop Hero, sticking rigidly with one deck strategy won't work forever. Each loop shifts the difficulty upwards dramatically, and enemies grow smarter. Adjusting your card choices regularly helps you tackle tougher chapters successfully. Here's how you can evolve and adapt your deck-building mindset as challenges become more intense.
When to Change Cards in Your Deck
Veteran loopers constantly tweak their strategies. If you beat a chapter quickly without significant struggle, don't immediately overhaul your whole build--just refine it slightly. However, certain clear signals tell you it's time for bigger changes:
- Repeated Losses or Close Calls: Getting regularly overwhelmed by monsters indicates your deck needs adjustment. Add crowd-control elements like Road Lanterns or extra healing sources from Villages and Wheat Fields.
- Feeling Loot-Starved: If gear upgrades arrive rarely, incorporate Battlefields to regularly supply your hero with improved equipment. Consistently better loot means steadily stronger characters.
- Struggling with Specific Enemy Types: Particularly troublesome foes might prompt you to shift your deck to better handle their traits. If ranged foes pile up, consider adding targeted removals via Ruins + Blood Groves to quickly neutralize threats.
Don't hesitate to switch things up. Experimenting with new card combinations lets you discover creative answers to tricky looping problems.
Balancing Risks and Rewards
Your deck decides the harmony between safety and loot. Too risky means quickly losing health, while too safe leaves gear weak, undermining your progression. Consider these careful balances in evolving your deck:
- Monster Density vs. Loot Quality: Monsters offer better rewards, yet stacking too many monsters at once leads to overwhelming encounters. Adjust enemy placement cautiously mid-game. For example, trade some enemy-heavy Spider Cocoons for controlled groups from tiles like Grove + Blood Grove, rewarding fewer but safer battles.
- Balanced Healing Methods: Solely depending on healing potions or campfires limits long-term sustainability. Reliable daily heals from tiles like Meadows + Chrono Crystals and periodic stronger heals from Villages combine nicely. Maintaining a healthy hero between fights prevents costly death loops.
Carefully considering these factors helps avoid extremes--both overly cautious stagnation and overly bold losses--and steadily propels you forward to harder chapters.
Removing Underperforming Cards
Certain cards, beneficial early in your adventures, eventually might become weaker choices. Regularly evaluate your placed cards. If you've not seen clear value lately from a previously reliable card, drop it. Specifically reconsider these cards later on:
- Rock and Mountain Tiles: Early loops eagerly rely on these for HP boosts, but eventually their spawning Goblin Camps and Harpies add unnecessary headaches. Later loops often benefit more from strong combat boosts or precise enemy management.
- Treasury Cards: Initially helpful when resources are scarce, later loops typically reward loot directly through tiles like Battlefields more efficiently. Often the Treasury loses usefulness as the game progresses further.
- Swamp Tiles: While handy when you have specific builds around vampires or healing inversions, most standard strategies lose a lot of potential healing to these risky tiles. Consider carefully if they're worth your trouble in late-game loops.
Dropping older cards frees you to incorporate fresh strategies and address specific threats directly, ultimately refining your playstyle for better success.
Adapting Decks for Specific Characters
Loop Hero's knight, rogue, and necromancer each have unique abilities suited to different card combos and loop layouts. Tailor your choices to match your starter character's strengths clearly:
- Warrior (Knight): Prioritize reliable gear drops to steadily toughen armor and maximize health pools. Tiles like Battlefields, Villages, and Blood Groves work perfectly, letting your durable hero safely trade blows without worrying excessively about damage.
- Rogue: Loot consistency matters massively since the rogue grabs gear post-loop rather than mid-fight. Go heavy on stable high-value enemy spawn points (Spider Cocoons, Ruins, Cemeteries) to secure large amounts of loot at each loop's end, allowing quick gear upgrades between rounds.
- Necromancer: Summoning skeletons demands less concern with direct attack damage and far more attention on personal defense and regeneration. Focus healing combos (Chrono Crystal + Meadows/Farms, Vampire Mansion + Villages) to keep health safely high behind summoned undead shields.
Adapting card choices to perfectly match your character's specific capabilities gives massive payoff. This alignment carefully pushes your looping strategy from simply adequate to reliably powerful.
Revisiting Your Strategy Regularly
Successful players stay adaptable. Loop Hero intentionally forces tough choices and unexpected challenges--bosses get more aggressive, enemy types start overlapping dangerously, and safe routes explode into chaos without warning. Regularly review your card performance throughout sessions:
- Ask Yourself: "Is healing enough or do I regularly drop dangerously low mid-loop? Do enemies crowd too intensely or do difficult foes reveal my weaknesses?" Change your card choices based on honest answers here.
- Identify Problems Clearly: Put notice on cards that create trouble more than benefits. Specifically watch which spots in your loops constantly threaten your survival. Often tiny deck tweaks function with greater impact than ambitious and comprehensive overhauls.
Regular carefully-tested refinements improve your skill at tackling Loop Hero's unpredictabilities, letting consistency guide you successfully through later loops and tougher enemy combinations.
Adapting your deck in Loop Hero isn't a chore--it's central to your ongoing success and enjoyment. Fine-tune your card choices thoughtfully, recognize and address your challenges head-on, and adjust strategies based on evolving problems. Flexible looping players stay ahead of Loop Hero's tricky challenges, mastering each boss and obstacle with confidence.