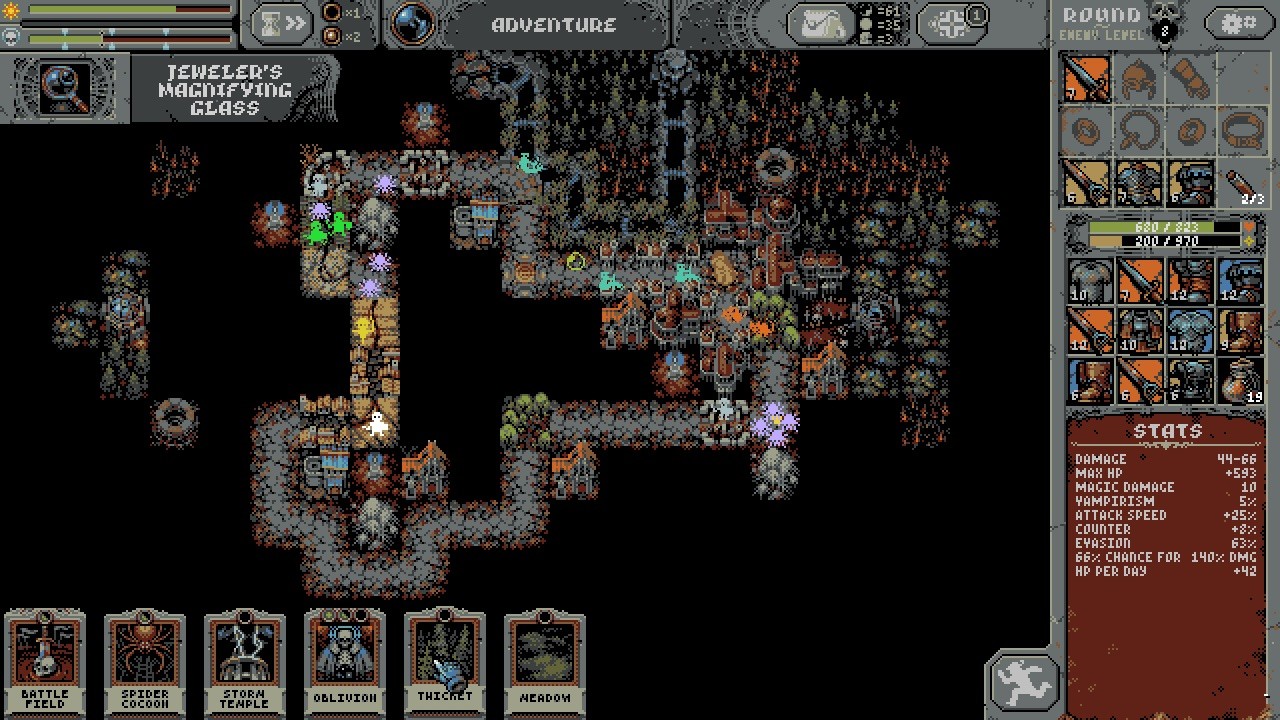
Loop Hero Card Placement and Strategy Guide
Master Loop Hero by placing cards strategically, creating enemy loops, building resources, optimizing powerful combos, managing the Lich, and unlocking cards.
Card placement in Loop Hero might not seem complicated at first--but after a few loops, you'll quickly notice the decisions you make start stacking up. Each card you play not only reshapes the loop itself, but it also directly impacts your hero's chances for survival, the types of enemies you'll encounter, and the resources you'll gather. Thoughtful, strategic tile placements can mean the difference between returning successfully to your camp, or being overwhelmed and losing valuable gathered loot. Balancing difficulty and reward is key, and knowing how certain cards interact or influence enemies can really transform your runs. Let's break down how effective card placement and smart strategy choices can help you navigate each challenging loop.
Understanding Enemy Loops in Loop Hero
You've probably noticed that placing cards along your path introduces new enemies, resources, or buffs. But did you know that careful combinations can create something called enemy loops? These are clusters of enemy-spawning tiles designed to give you extra resources and valuable equipment--if you can manage to survive the increase in combat.
Enemy loops help you farm the monsters you need efficiently, boost your experience, and harvest better loot faster. Let's talk about how to strategically set them up without overwhelming yourself.
Why Creating Enemy Loops Matters
Before we jump into specifics, here's why you might want to create enemy loops in the first place:
- More Loot & XP: Battling extra monsters means faster leveling and better gear drops.
- Resource Collection: Defeating specific enemies is often the quickest and easiest route toward rare materials.
- Streamlining Your Strategy: Rather than spreading monsters randomly along your path, grouping them together ensures steady fights followed by safe breathing room elsewhere.
But be careful: Stack too many tough enemies together, and one difficult loop could cost you the entire run.
Choosing Cards Wisely for Enemy Loops
Not all cards suit enemy loop strategies. Here are some of the best ones to work with:
Spider Cocoon
Dropping Spider Cocoons on your road produces easily manageable spider enemies every morning. This steady, predictable stream means you'll regularly snag loot without facing dramatic spikes in difficulty. The spiders typically aren't too dangerous, but the regular loot drops stack up nicely.
Grove and Blood Grove
Groves spawn tougher enemies known as 'Ratwolves,' which carry better loot and materials. However, pairing a Grove with a Blood Grove is key, since Blood Groves instantly eliminate enemies whose health drops below 15%. Set these tiles together, and you'll battle strong enemies efficiently without prolonged fights.
Vampire Mansion
Vampire Mansions spawn vampires into adjacent tile battles. At first glance, that sounds risky, but vampires drop high-tier items and rare resources like vampire sharps and orb fragments. Position Vampire Mansions near easier enemies like spiders rather than higher-level fights, to maintain manageable combat encounters and loot gathering.
Battlefield
These tiles generate treasure chests after loops and sometimes ghosts upon defeating enemies, upping gear gain rapidly. Placement near your planned enemy clusters amplifies loot returns but watch out--stacking multiple Battlefields together generates dangerous Blood Clots, so avoid excessive overlap. It's all about balance.
Strategic Card Placement How-to
Now you know the basics, here's a handy step-by-step guide to assembling your enemy loop effectively:
Step 1: Pick Your Spot Carefully
Choose looping road areas that allow enough space to comfortably place enemy-producing tiles together. Ideally, you'll place your enemy loops early enough in the path while your hero's health and resources are highest.
Step 2: Start Easy and Scale Up Slowly
Begin your loop small. Start by introducing manageable enemy sources like Spider Cocoons. Pay attention to your hero's performance before adding tougher enemies like Ratwolves (Grove) and Vampires (Vampire Mansion).
Step 3: Add Buffing Tiles to Support Combat
Placing a Village tile near tougher enemy loops restores a decent chunk of your HP when passing through. Combine a Village and Vampire Mansion for a "Ransacked Village" that initially spawns challenging enemies but eventually transforms into improved healing and valuable quest rewards.
Step 4: Watch for Difficulty Spikes
Remember, not every loop needs maximum monsters. Pay attention after placing tiles. If your battles get harder too suddenly, dial down placements or spread enemy tiles across multiple locations rather than in one concentrated area.
Step 5: Harvest Loot and Adjust as Needed
After each loop, evaluate the effectiveness of your placements. Are you consistently ending each loop near death? Adjust tiles carefully. Too easy, letting resources go uncollected? Add more rewarding elements. Enemy loops evolve, and regularly adjusting them ensures stable long-term runs.
Mistakes to Avoid When Building Enemy Loops
Just as important as creating effective enemy loops is learning the common mistakes:
- Don't Bunch Strong Enemies Together: Like Goblin Camps or multiple overlapping Vampire Mansions. You'll overwhelm yourself fast.
- Keep Healer Tiles Accessible: Having regenerative tiles like Meadows and Villages helps manage combat difficulty.
- Not Watching Road Length: If you clutter too many monsters on short road sections, you'll regret it quickly. Keep tough encounters manageable by spacing them out.
Mastering Enemy Loops for Loot, XP, and Resources
Enemy loops aren't just about combat--they’re tactics that reward careful thought and detailed planning. Using these guidelines, you'll set up thriving combat clusters that consistently earn strong loot, resources, and experience, helping each run go further and boosting your overall camp progression.
Loop Hero pushes you to constantly re-evaluate your placement strategy. Adjust frequently, experiment a little, and you'll turn these enemy loops into the backbone of successful expeditions.
Maximizing Your Gains with Resource Tiles
Fighting and looting aren't your only focus; to upgrade your camp significantly in Loop Hero, you'll absolutely need a steady flow of resources. That's where resource tiles come into play--they passively generate supplies to upgrade your base, armoury, and buildings, giving significant boosts to your runs. Thoughtful usage of resource tiles can transform a mediocre loop into a productive adventure.
Carefully setting up these tiles, you'll quickly pile up wood, stones, metals, food rations, and rarities such as Orbs--making each loop worth your time. Let's go through the standout resource-focused tiles and how you best use them.
Understanding Basic Resource Tiles
Your primary resource tiles include Meadows, Rocks, Mountains, and Treasuries. Proper placement patterns significantly boost resource harvesting. Here's a quick breakdown of each:
Meadows and Blooming Meadows
Dropping Meadows earns stable HP regeneration each new day, essential since you're constantly losing health in combat. But there's a valuable trick here--placing Meadows next to any non-meadow tile converts them to Blooming Meadows. These prettier tiles nearly double daily HP restoration, crucially extending your hero's survival. Strategically, you want to pair Meadows with Rocks, Mountains, or even Treasuries and Chrono Crystals. It quickly adds up to health returning to manageable levels even after tough monster clusters.
Rocks and Mountains
Using Rocks and Mountains raises your hero's max HP, letting them last through tougher loops and soak bigger hits. Placing these two blocks side by side creates even bigger bonuses--particularly when you combine them into a large 3x3 grid, forming a Mountain Peak. A Mountain Peak grants massive HP boosts instantly but watch out--once created, it spawns Harpies that occasionally attack your hero. Balance your need for more health against potential monster spawns. Early loops benefit greatly from rapid Mountain Peaks, setting you up safely before late-game difficulty ramps up too much.
Treasury
Treasuries give you massive rewards such as useful fragments, crafting resources, and equipment. To unlock the Treasury chest, you'll need to surround it entirely with other tiles. Many players circle their Treasuries with Meadows most effectively since it simultaneously unlocks the Treasury while activating Blooming Meadows to boost daily heals. Be aware--once the Treasury chest unlocks, the empty Treasury then produces Gargoyles, moderately strong enemies representing a sudden threat. Time unlocking Treasuries to occur on manageable loops, rather than during peak combat intensity.
Advanced and Special Resource Tiles
Chrono Crystals
Chrono Crystals don’t directly grant resources, but they significantly boost adjacent tiles' effects, doubling daily Meadow healing power when placed beside them. Dropping a Crystal tile among a cluster of Blooming Meadows exponentially improves HP regeneration. Alternatively, position Chrono Crystals beside monster-spawning tiles like Spider Cocoons or Vampire Mansions, which accelerates monster generation, indirectly increasing material drops, XP, and loot. Consider the risk carefully--it’s usually safer to use Crystals with Meadows rather than dangerous enemies unless you're completely confident with combat difficulty.
Wheat Fields
Wheat Fields connect exclusively to Villages and significantly improve healing each loop pass. More importantly, defeating spawning Scarecrows rewards consistently useful materials like Stable Branches and Rations--critical when unlocking camp upgrades. Remember, though, that Wheat Fields only function adjacent to Villages. Too many become annoying rather than useful, as Scarecrows can become surprisingly tough en masse later. Build Wheat Fields cautiously, and closely monitor combat to adjust accordingly.
Cemeteries
Cemeteries regularly generate skeleton enemies, which drop preserved materials ideal for higher-level camp upgrades. Skeletons grant unique and rare crafting supplies like Stable Metals and Memory Fragments. Even though skeleton fights can become challenging quickly, their consistent loot makes Cemeteries powerful early-to-mid-game resource farms. Don't bunch multiple Cemeteries together unless you're ready for a significantly ramped-up difficulty--spread them around to harvest their resources consistently with manageable fights.
Placement Strategies for Efficient Resource Farming
Now you've got a basic understanding--what placement guidelines should you follow?
Pair Meadows Smartly and Scale Gradually
Always plan Meadow positioning beforehand. Start early in your run, placing Meadows to create Blooming fields immediately by pairing them alongside Rocks or Mountains. Expand gradually, carefully scaling daily healing generation alongside difficulty increases. When possible, utilize Chrono Crystals centrally positioned among Blooming Meadows clusters to maximize regeneration safely.
Prioritize Treasury Unlocking Early
Unlocking Treasuries early provides significant jumps to your hero's gearing and resource accumulation. Quickly circle each Treasury using Meadows first (converting to Blooming Meadows), maximizing early-game resource returns and HP regeneration simultaneously. Aim to finish unlocking Treasuries mid-loop, allowing you the breathing space to handle new Gargoyle spawns comfortably.
Time Mountain Peak Creation Wisely
Create your Mountain Peak relatively quickly--ideally between loop two to four, where survival is manageable enough without relying too heavily on external regeneration tiles yet. This improved health bar grants security later, so you safely pack more enemy loop areas that yield valuable loot with fewer worries.
Balance Combat Risk vs. Reward
Don't greedily spam too many monster-heavy resource tiles such as Cemeteries or multiple Wheat Fields at once. Ensure your loops feature varied tiles offering balanced experiences, supplying resources without overwhelming hero health. Check your loop difficulty frequently to make careful, incremental adjustments.
Common Mistakes to Watch Out For
Avoiding these pitfalls boosts your Resource tile efficiency dramatically:
- Ignoring Blooming Meadows' Potential: Don't waste plain Meadows--maximize their regeneration by placing them alongside Mountains, Rocks, or Treasuries.
- Building Too Many High-Risk Tiles: Focusing too heavily on Cemeteries or Mountains creates unintended difficulty, overwhelming your hero too soon. Space them smartly.
- Failing to Unlock Treasuries Rapidly: Not fully unlocking Treasuries wastes significant potential resource generation. Always place Treasuries strategically and unlock them early--boosting your loot and resource backs consistently.
Wrap-Up: Resource Tiles Are Loop Hero Essentials
Your loop-building success revolves around carefully selected and placed resource tiles. Smart positioning can consistently power your loops, upgrading your lasting survivability and your long-run resources simultaneously. Approach these tiles thoughtfully, adjust placements regularly, and they'll significantly extend the viability and productivity of your runs for each new expedition.
Optimizing Card Combos for Maximum Efficiency
The real fun in Loop Hero kicks in when you start experimenting and stacking card effects together. Clever combinations let you squeeze the most healing, loot, and resources from your expeditions. However, some card pairings greatly outperform others, so let's break down the most effective card combos and how to position them correctly.
Vampire Mansion + Village: Risky, But Rewarding
Pairing a Vampire Mansion with a Village initially transforms it into a Ransacked Village--spawning tough Ghouls in combat for three loops. Survive those loops, though, and it transforms again into a Count's Lands, offering boosted healing, better quests, and higher-quality gear rewards each loop.
Sounds great--but the catch is the high difficulty spike from Vampires and Ghouls. When implementing this combo:
- Time Carefully: Place this combination early enough (usually Loop 2 or 3) so your hero is geared properly but not too late to miss out on the powerful long-term benefits.
- Limit the Number Initially: Don't stack multiple Vampire-Village combos at once. Spread out your placements over several loops to keep combat manageable.
If survival proves challenging, balance these difficult segments by adding healing tiles like Blooming Meadows or Wheat Fields along your route.
Grove + Blood Grove: A Clean-Up Crew Combo
A regular Grove spawns Ratwolves--fairly easy enemies that deliver resources and gear. Adding a Blood Grove adjacent creates an even stronger combination. Any enemy that falls below 15% HP within the Blood Grove's radius instantly dies. Your hero spends less time on combat, takes less damage overall, and you still rack up valuable materials.
Maximizing this pairing:
- Overlap Routes Wisely: Place the Grove at routes where additional monsters already spawn, so the Blood Grove's "clean-up" mechanic impacts monsters from multiple tiles at once, drastically reducing combat time.
- Watch for Blood Golems: Every now and then, Blood Groves spawn powerful Blood Golems after absorbing enough monster kills. Space out your Grove + Blood Grove combos or keep healing-heavy tiles prepared nearby to manage these tougher enemies.
Spider Cocoons + Chrono Crystals: Rapid Resource Generation
Spider Cocoons generate multiple Spider enemies per loop, quickly yielding consistent resources and gear. Pairing them with Chrono Crystals increases spawn rates significantly. This strategy accelerates your resource gain drastically but also ups combat frequency.
Getting value without overwhelming yourself:
- Place Spider Cocoons Thoughtfully: Set them up early along relatively safe paths--allowing spiders to appear without stacking tough enemies together.
- Prepare Secondary Effects: Combine with Blooming Meadows near Chrono Crystals to regenerate lost HP. Spiders typically aren’t tough individually; the main risk comes from large numbers.
Battlefield Combo Placements: Ghost Hunting
Battlefields give great gear every loop by spawning treasure chests--but their hidden strength is ghost creation. Placing two Battlefields so their influence overlaps creates a "Blood Path," spawning Blood Clots instead of regular chests. Defeating enemies near overlapping Battlefield zones also creates ghosts occasionally, which have multiple gear drops but also additional risk.
To leverage this combo safely:
- Keep Combat Nearby Manageable: Pair Blood Paths with easier enemies like Ratwolves or Spiders rather than Skeletons or Vampires. Fights remain quick, keeping risks minimal.
- Use Sparingly: Overusing overlapping Battlefields gets risky fast. Keep only one or two Blood Paths per loop and monitor carefully.
Meadows + Rocks/Mountains: Fundamental Healing Boost
As previously mentioned, placing Meadows next to Mountains or Rocks converts them to Blooming Meadows, greatly increasing daily healing. Although simple, this tactic should be central to your loop strategy, securing vital passive regeneration each day.
For even better outcomes:
- Loop Placement Carefully: Place your Blooming Meadows sections evenly throughout each loop, rather than clustering all your healing in one spot. This spreads healing benefits effectively across more challenging enemy areas.
- Combine with Treasuries: Don't forget placing Meadows around Treasuries; you're combining great regeneration with increased loot efficiency.
Oblivion Card: The Perfect Combo Reset Button
To optimize card combos properly, keep an Oblivion card reserved in your hand whenever possible. It instantly removes problematic enemy-spawning tiles or accidental combo mistakes made during placement.
Strategically deploying Oblivion:
- Cancel Unexpected High-Risks: Made a Vampire Mansion-Village pairing that's too difficult? Quickly remove the Mansion to reset risks back to a comfortable level.
- Destroy Overlapping Battlefields or Blood Groves Too Hard: Oblivion resets dangerous double effect placements--granting flexibility to your loops even late-game.
Putting it All Together
Loop Hero rewards players who mix clever combinations with thoughtful loop management. Always think ahead while placing. Avoid adding too many risky card combos simultaneously--balancing your loop difficulty with gradual risk increments is the safest play.
Also, consider timing: early-game combinations often pay off significantly later in a run. Plan Vampire Villages ahead of time rather than reacting late-game. Ensure your loops don't overload your hero with overwhelming cluster after cluster of enemies--balance enemy densities by alternating higher-risk combinations with generous healing tiles.
With careful looping decisions and card placements, optimizing these combos makes your Loop Hero expeditions less about mere survival and more about consistent resource piling, progression boosts, and steadily improving loot. Play smart, plan carefully, and you'll maximize each expedition's success.
Managing the Lich: Taking Control of the Boss Encounter
You've pieced together clever card combinations and skillfully managed your loops--great! But when your meter hits full and the Lich appears, fighting the boss can quickly derail your run. To beat him consistently, you need smart preparations and clear strategies.
Understanding the Lich and His Powers
The Lich shows up once you've placed enough tiles to fill your map's boss meter, creating a boss tile (Lich's Palace) around your campfire tile. Every Lich's Palace tile boosts the boss’s health and damage, quickly raising the fight’s difficulty. Here's what you're facing:
- Lich's Palace Tiles: These appear automatically around your campfire once the Lich spawns. Each tile boosts the Lich’s HP by 5% and damage by 5%. More tiles mean a way tougher fight.
- High HP and Power: The Lich packs strong attacks and a high health bar, tough enough to defeat unprepared heroes easily.
- Difficulty Scaling: Each loop you complete raises enemy difficulty, so you'll want to fight the Lich sooner rather than much later. Delay the boss fight if your gear isn't quite strong enough, but too much delay makes him tougher.
Now, let's talk action steps to fight smart, remove Lich advantages, set yourself up well, and manage your resources cleverly.
Controlling the Lich's Palace With Tile Placement
Because the Lich’s greatest strength is boosted by surrounding palace tiles, the simplest solution? Give him no room to build.
Here's the trick: before filling your boss meter, place other tiles around your campfire proactively. This significantly reduces space for Palace tiles to form. Tiles great for doing this include:
- Groves, Meadows, Rocks: Simple tiles you need anyway; placed near campfire early, they block Palace tile formation.
- Villages and Cemeteries: These placement-friendly tiles can be placed carefully to occupy space near campfire, greatly diminishing the Lich’s boosts.
- Road Lanterns: While these reduce monster spawns, their real advantage here comes in simply filling up the map precisely around your campsite, limiting Palace appearance.
Each blocked Palace space makes the fight easier. The fewer boosts the Lich gains, the more likely your victory will be.
Hold an Oblivion Card--Your Ace in the Hole
Always, always have at least one Oblivion card in your hand when nearing the boss trigger. Oblivion immediately deletes any placed tile--including Palace tiles.
Once the Lich spawns, you'll clearly see the locations of all his Palace tiles. Use Oblivion strategically to quickly eliminate the worst-placed tiles that significantly buff his power. Removing just one or two Palace tiles drastically brings his hit points and strength back to manageable levels, turning a fight you might lose into one you'll comfortably control.
Gear and Stat Priorities for the Lich Fight
Before the Lich fight, gear up thoughtfully. Combat-centered stats should generally outshine pure economy or farming-oriented stats here. Specifically:
- High Damage and Attack Speed: High damage output, boosted by good attack speed, makes a quick fight--key for boss encounters.
- Vampirism or Regeneration as Healing Options: Self-healing ensures you last through the Lich's heavy hits--prioritize gear with decent vampirism or regeneration if your damage is already strong.
- High Evasion or Defense Stats: Evasion is great for avoiding entire hits, while a strong defense reduces each blow’s sting. Both heavily benefit the battle.
Avoid overly speculating on better loot drops post-Lich fight; equip the best current combat-focused gear available. It’s not worth entering this boss fight hoping for post-battle gear returns--you must survive first.
Consider Timing and Positioning Before Fighting
Your loop placement and chosen loop to trigger the Lich matter. If you're closing in on triggering the boss:
- Carefully Place Healing Tiles: Place Blooming Meadows evenly around your loop to heal steadily--you want your health topped off every visit to your campfire right before triggering the boss.
- Delay One Loop Wisely: If you’re one tile away from triggering the Lich, consider finishing your loop first, equipping better loot from that loop’s battles, healing at camp, and only then place the tile to summon the boss fresh at your highest possible strength.
- Position Campfire at Optimal Loop Spot: Initially set your campfire at good intervals. Since your fight happens at campfire, position it to follow easier mobs, ensuring you enter the boss fight immediately following safer encounters. Your hero arrives at max HP and with full strength to face the Lich directly.
Fighting the Lich Smartly: Tactics During Battle
Once combat begins, you’re largely observing. Still, pre-fight decisions make the difference here. By carefully preparing through palace tile control, gear, and placement, the battle itself will be dramatically easier.
If things look bad mid-fight:
- Retreat Tactically: Remember, retreating mid-battle makes you lose more gear. It’s often better to consider strategic loop placement to avoid needing to retreat at all.
- Lost the First Fight? Don’t Panic!: Losing to the Lich happens and doesn't make your run pointless. Loop Hero’s structure ensures each defeat offers lessons, resources, and useful experience. Next time, pace and tile block more cautiously before triggering the boss.
Wrapping It Up: Preparation Beats Luck With the Lich
Beating the Lich reliably isn’t just about gear and combat strength--it’s preparation, positioning, and careful tile management. By thoughtfully controlling his automatic Palace tiles, holding Oblivion cards for targeted tile removal, and considering loop timing carefully, you consistently reduce his power before the battle even starts.
Keep these pointers in mind, and your fierce Loop Hero will roll through this tough boss regularly, gaining crucial progression items, bonuses, and skills to dominate future loops easily. Happy looping!
Unlocking New Cards--Building Your Arsenal
Loop Hero thrives on tiles and cards--those handy tools that determine your hero’s journey loop after perilous loop. While the starter deck gets you off the ground, unlocking new cards greatly expands your strategic arsenal. Each new card fundamentally changes how you approach runs, enemies, tile manipulation, and more.
Understanding exactly how and when you unlock each card isn't always obvious--Loop Hero doesn't lay things clearly out at first glance. But no worries--here’s how it all works:
What Exactly Are Cards Anyway?
First off, in Loop Hero, cards determine tiles and features that appear on your looping path or its surrounding areas. For example, a ‘Village’ card creates a village along the road providing quests and arrival-based healing; a ‘Mountain’ boosts HP when clustered with adjacent mountains or rocks; and ‘Vampire Mansion’ adds tricky vampires to adjacent battles. In other words, your deck-building matters big time. Each run lets you choose cards for customizing the looping pathways.
At the start, your deck selection might feel pretty sparse. That's intentional. The game encourages unlocking new tiles (and thus new strategies) over multiple playthroughs.
How Do You Unlock New Cards?
Unlocking cards mostly happens between expeditions at your campsite. The campsite is your base of operations--it's where you place buildings called Camp Structures. These structures do more than just look neat; they open pathways to powerful new cards as well.
To unlock new cards:
- Build Camp Structures: Each structure in your homebase comes with built-in game-changing rewards--often new cards. Build key buildings like the Gymnasium or Cemetery at your camp to unlock fresh tiles for your next loops.
- Upgrade Existing Buildings: Some cards only become available when you upgrade existing camp structures. This usually comes a bit later, after you've gathered more advanced resources and progressed further in your loops.
- Take On Specific Tasks or Challenges: Occasionally, special cards unlock by accomplishing certain in-game achievements, milestones, or events. While rarer, keeping an eye out ensures you don't miss uniquely powerful options.
Essential Early-Game Cards and How to Get Them
Certain newly unlocked cards stand out early--try prioritizing these first:
- Blood Grove (Unlocked by building the Field Kitchen): A seriously useful card. It instantly kills enemies below 15% health if they're next to its area of effect. It's fantastic for difficult monsters and early bosses.
- Village (Unlocked by building the Gymnasium): Villages provide healing and a guaranteed quest monster each loop cycle. Quest monsters drop enhanced loot, making Village one of the easiest ways to boost gear quality early on.
- Chrono Crystals (Unlocked by creating the Library): These tiles double the impact of surrounding daily-effect tiles (like Meadows), significantly increasing passive health regeneration or resource yields when placed smartly.
Advanced Cards for Strategic Deck Buildouts
Once you're comfortably securing victories and gathering advanced resources, you'll start unlocking more strategic options:
- River (Unlocked through expeditions and building intelligent supply structures): Interacts cleverly with tiles to maximize effects--such as multiplying adjacent tile bonuses. Pairing a River tightly with Thickets turns your hero into an attack-speed powerhouse.
- Suburbs (Unlocked by building the Intel Center): These tiles speed up hero leveling, vital for powerful late-run passive traits. Throw down long clusters of suburbs to rapidly reach higher levels within fewer loops.
- Ancestral Crypt (Unlocked alongside more advanced structures): Replaces standard health regen with a powerful health bonus each time you defeat an enemy, creating vastly different but potent tactics around enemy kills rather than passive HP recoveries.
Managing Your Deck--Avoiding Bloat
There's temptation--especially after unlocking a shiny new card--to throw every cool tile into your deck immediately. However, a bloated deck means each essential card shows up less frequently.
Oftentimes, a tight deck performs far better:
- Only slot cards serving a specific planned strategy for your run.
- Avoid pulling unhelpful monsters or complicated tiles without specific goals or clear tactics in mind. Loop Hero rewards planned, streamlined decks far more than random, chaotic sets.
Yes, experiment! But experiment intentionally. Otherwise, winning streaks fade into confusion as useful cards vanish under excess options.
Experimentation and Endless Customization
The magic of Loop Hero--even with uncompromising retro pixel graphics--is experimentation. Constantly test combos; nothing beats carefully considered yet creative deck combos.
As you unlock new cards, revisit old strategies. Previously mediocre combinations dramatically improve when paired thoughtfully with newly acquired cards. Always remain flexible, as the game tosses fresh curveballs each run.
Final Tips on Card Unlock Progression
- Check building screens regularly: Don't forget--sometimes it isn't obvious when a new card becomes possible. Check the campsite structures frequently to ensure opportunities aren't missed.
- Balance between unlocking cards and resource upgrades: Building and upgrading structures costs valuable resources. Aim for careful balance between unlocking exciting strategic new cards and improving survivability or resources at base camp.
Unlocking new cards sits at Loop Hero's center, moving you incrementally forward as loops gain difficulty. Building out your deck thoughtfully ensures exciting possibilities continue arising long into your loop-heroing career.
With these tips under your belt, your strategic arsenal grows smoothly. Plot each new unlock smartly, expanding your possibilities gradually and naturally.